# PostgreSQL

## Create a Cluster

1. ### Click the 'add a new cluster' button and select PostgreSQL.

   <figure><img src="https://123cluster.com/wp-content/uploads/2024/04/pg_create_cluster1.5978324d7fec8573c0a5-1024x507.png" alt=""><figcaption></figcaption></figure>
2. ### Fill the required information about the database cluster and click next.

   <figure><img src="/files/J2EAmuSKKSS46Uwn2PXC" alt=""><figcaption></figcaption></figure>
3. ### Fill additional required information and click 'Check' to verify validity.

   <figure><img src="/files/f6V7dJGXV8ic2DtPiBzp" alt=""><figcaption></figcaption></figure>
4. ### 'Rest API' Button will copy to clipboard for your DevOps tools.

   <br>

   <figure><img src="/files/uL1vnQOjHkS12gopqC83" alt=""><figcaption></figcaption></figure>
5. ### Click 'Submit' to create the cluster.

## Restore a node or cluster

1. ### Drag the selected backup onto the primary.

   <br>

   <figure><img src="/files/If4zVtm52TGsdTBcm4X5" alt=""><figcaption></figcaption></figure>
2. ### Click the correct option for your restoration point.

   <br>

   <figure><img src="/files/rqV12eM5I5rlmzi2ThTc" alt=""><figcaption></figcaption></figure>
3. ### To avoid loss of data, type 'restore me' into the text box to confirm your decision.

   <br>

   <figure><img src="/files/7AWUTAsRGksNncdhQ41K" alt=""><figcaption></figcaption></figure>
4. ### 'Rest API' Button will copy to clipboard for your DevOps tools.

   <br>

   <figure><img src="/files/IiCKjWRKo3aKrU8mgD9q" alt=""><figcaption></figcaption></figure>
5. ### Click 'Submit' to initiate the restore.

## Create a standby

1. ### Switch to the 'Standbys' tab on your cluster inventory.

   <figure><img src="/files/yEXdwWIWxbZD3oEfYFqa" alt=""><figcaption></figcaption></figure>

2. ### Drag the object labeled 'Drag me on to Primary to create a standby' onto the primary

   <br>

   <figure><img src="/files/8nGKoHy4azqFA0T803G9" alt=""><figcaption></figcaption></figure>

3. ### Fill in the required information for your standby node and click next.

   <br>

   <figure><img src="/files/XAbUQuMYMkh5kkDsnsE8" alt=""><figcaption></figcaption></figure>

4. ### Fill additional required information and verify settings' validity by clicking the 'Check' button.

   <br>

   <figure><img src="/files/fbzDtbj5Bda3U33kVIv9" alt=""><figcaption></figcaption></figure>

5. ### 'Rest API' Button will copy to clipboard for your DevOps tools.

   <br>

   <figure><img src="/files/6NvtF3CxmIglKLivhOkj" alt=""><figcaption></figcaption></figure>

6. ### Click 'Submit' to create the Standby.

## Create a database

1. ### Switch to the 'Databases' tab on your cluster inventory.

   <br>

   <figure><img src="/files/W28kPN56D3G1Ty0u1NLS" alt=""><figcaption></figcaption></figure>
2. ### Drag the object labeled 'Drag me on to Primary to create a database' onto the primary.

   <br>

   <figure><img src="/files/I1kvKGksFlRtShczgcm8" alt=""><figcaption></figcaption></figure>
3. ### Choose a name for your database and click the 'Check' button to ensure it is available.

   <br>

   <figure><img src="/files/qVcEP8udjWEBrz43D6oF" alt=""><figcaption></figcaption></figure>
4. ### You may opt into the auto-delete function, your database will be deleted at your desired date.

   <br>

   <figure><img src="/files/yr8im3IqhpGaWZ4uwmYu" alt=""><figcaption></figcaption></figure>
5. ### 'Rest API' Button will copy to clipboard for your DevOps tools.

   <br>

   <figure><img src="/files/ePBptZu6t3lYxYUf0KkR" alt=""><figcaption></figcaption></figure>
6. ### Click 'Submit' to create the Database.

## Start and stop a node

1. ### Double click the primary node to enter the node configuration.

   <br>

   <figure><img src="/files/cPgZzYkiBVvZfQmUNLbT" alt=""><figcaption></figcaption></figure>
2. ### To stop the node, click the 'Stop' button.

   <br>

   <figure><img src="/files/CNThZxgHFLz48aaQVDS0" alt=""><figcaption></figcaption></figure>
3. ### The instance status is shown on the left, a red star indicates the node is stopped.

   <figure><img src="/files/6eIJmn7sMD8lv0lCU0uo" alt=""><figcaption></figcaption></figure>
4. ### To restart the node, click the 'Start' button.

   <br>

   <figure><img src="/files/WlSo4AUxsX0mTv52jrgn" alt=""><figcaption></figcaption></figure>

## Set node config and limits

1. ### Double click the primary node to enter the node configuration.

   <br>

   <figure><img src="/files/Uy9tBki82Xv6dy2k9ET3" alt=""><figcaption></figcaption></figure>

2. ### These are the current setting of your node.

   <figure><img src="/files/FMuUdZK5rfQ7qfVUGMMW" alt=""><figcaption></figcaption></figure>

3. ### Click the 'change' button to open the node settings.

   <br>

   <figure><img src="/files/ZHHSg48GqHkawqwlh1v0" alt=""><figcaption></figcaption></figure>

4. ### Open the drop-down menu to modify your node.

   <br>

   <figure><img src="/files/onF5Pq446UpDeCi7rJ9f" alt=""><figcaption></figcaption></figure>

5. ### 'Rest API' Button will copy to clipboard for your DevOps tools.

   <br>

   <figure><img src="/files/afIIXnhWIgvg67UU06tF" alt=""><figcaption></figcaption></figure>

6. ### Click 'Submit' to confirm your changes.

## Backup a node or a cluster

1. ### Switch to your 'backup' tab on your cluster inventory.

   <br>

   <figure><img src="/files/RD1BBdad8BVPNhnQ1PZj" alt=""><figcaption></figcaption></figure>
2. ### To create a backup, drag your primary node.onto your backups inventory.

   <br>

   <figure><img src="/files/59zldlpSHTB2tJ3mb6Nw" alt=""><figcaption></figcaption></figure>
3. ### Select your desired backup strategy, standard backup or schedule a routine backup.

   <br>

   <figure><img src="/files/A3DUsyqfMOvbOkPsdcCU" alt=""><figcaption></figcaption></figure>
4. ### Select a destination for your backup to be stored and whether or not you would like your backup to be compressed.

   <br>

   <figure><img src="/files/UQy72cbcZg3GSKsCgJ1F" alt=""><figcaption></figcaption></figure>
5. ### 'Rest API' Button will copy to clipboard for your DevOps tools.

   <br>

   <figure><img src="/files/IZAnkySCTJ5yuYGGh4hV" alt=""><figcaption></figcaption></figure>
6. ### Click 'Submit' to start your backup.

## Backup a database

1. ### Click the 'Physical layout' switch to view the databases in the cluster.

   <br>

   <figure><img src="/files/DzPFytpurQ5Ik4mKj1Tw" alt=""><figcaption></figcaption></figure>
2. ### Switch to your 'Import/Export' tab to view your database backup inventory.

   <br>

   <figure><img src="/files/OadqZatNh0lylOhLC5R9" alt=""><figcaption></figcaption></figure>
3. ### Drag your desired database onto your database inventory.

   <br>

   <figure><img src="/files/xDuFqaVgNOnoDa8WJBcL" alt=""><figcaption></figcaption></figure>
4. ### Choose a name for your backup database, select additional options and click next.

   <br>

   <figure><img src="/files/1JF7vehiAtBWSFji9Jdf" alt=""><figcaption></figcaption></figure>
5. ### 'Rest API' Button will copy to clipboard for your DevOps tools.

   <br>

   <figure><img src="/files/aYZQIl4RtvH2njFFmzuT" alt=""><figcaption></figcaption></figure>
6. ### Click 'Submit' to start your backup.

## Restore a database

1. ### Switch to your 'Import/Export' tab to view your database inventory.

   <br>

   <figure><img src="/files/oDMBCS6Fz8VhzJqUaKID" alt=""><figcaption></figcaption></figure>
2. ### Drag your desired backup onto your primary node.

   <br>

   <figure><img src="/files/BLK4gdEXHd1g0abmxx1C" alt=""><figcaption></figcaption></figure>
3. ### Type 'restore me' into the text box to avoid accidental loss of data.

   <br>

   <figure><img src="/files/is9tlio9hqKCSZYqTfr0" alt=""><figcaption></figcaption></figure>
4. ### 'Rest API' Button will copy to clipboard for your DevOps tools.

   <br>

   <figure><img src="/files/pMHNN2c2rYaPcTjATcaO" alt=""><figcaption></figcaption></figure>
5. ### Click 'Submit' to restore.

## Drop a node

1. ### Drag the node you with to drop onto the bin, can be either primary or a standby.

   <br>

   <figure><img src="/files/4zNrBBk18dP7YfTt5EJ2" alt=""><figcaption></figcaption></figure>
2. ### Type 'drop me' into the text box to confirm your decision.

   <br>

   <figure><img src="/files/pbEfv9mjw8onWV2Iuqeb" alt=""><figcaption></figcaption></figure>
3. ### 'Rest API' Button will copy to clipboard for your DevOps tools.

   <br>

   <figure><img src="/files/g6jInboRX1lUksPkSWXY" alt=""><figcaption></figcaption></figure>
4. ### Click 'Submit' to drop the node.

## Drop a database

1. ### Click the 'Physical layout' switch to view the databases in the cluster.

   <br>

   <figure><img src="/files/aIyAjUFAwsp9VHArltK1" alt=""><figcaption></figcaption></figure>
2. ### Drag the database you wish to drop onto the bin.

   <br>

   <figure><img src="/files/NyqA3JYDAGMC37MWJizd" alt=""><figcaption></figcaption></figure>
3. ### Type 'drop me' into the text box to confirm your decision.

   <br>

   <figure><img src="/files/pp8gGyA15x1BOptZV8R0" alt=""><figcaption></figcaption></figure>
4. ### 'Rest API' Button will copy to clipboard for your DevOps tools.

   <br>

   <figure><img src="/files/8J6ELifFPMsKyjjDCw94" alt=""><figcaption></figcaption></figure>
5. ### Click 'Submit' to drop the database.

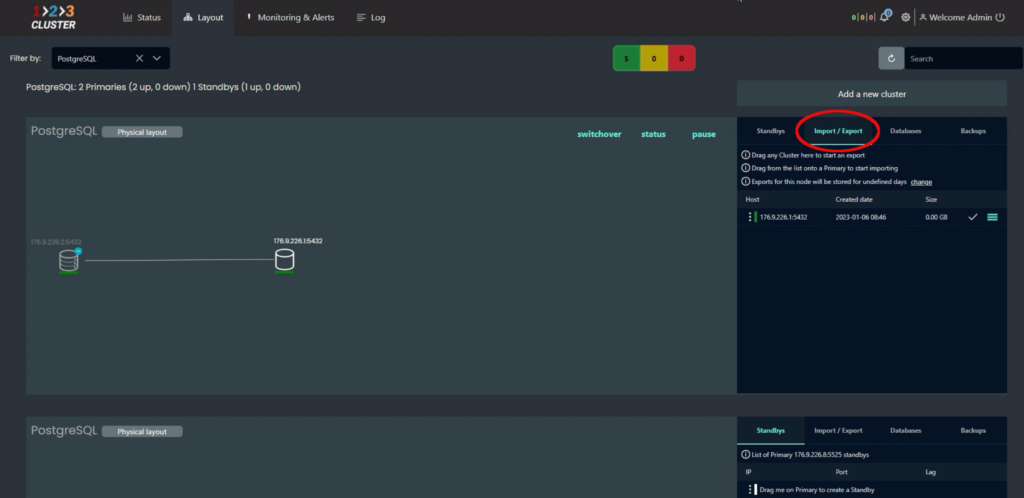
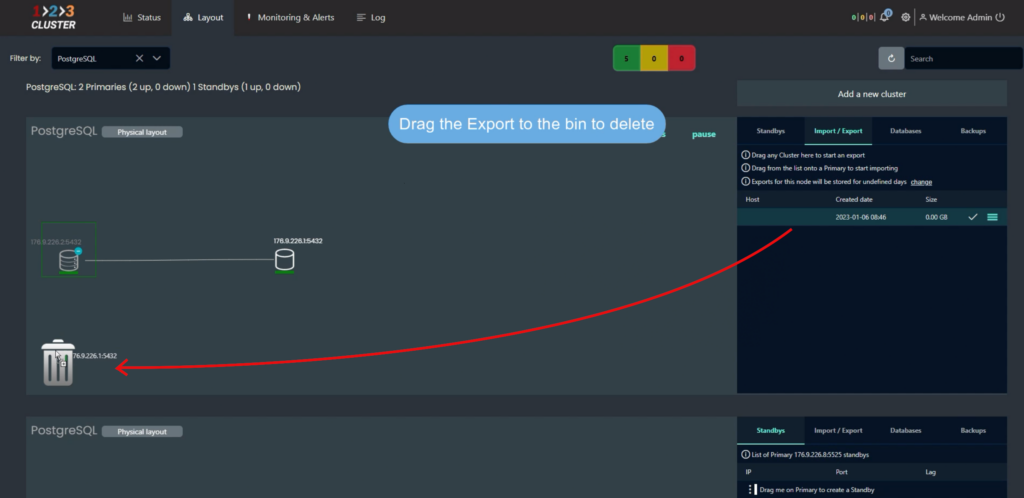
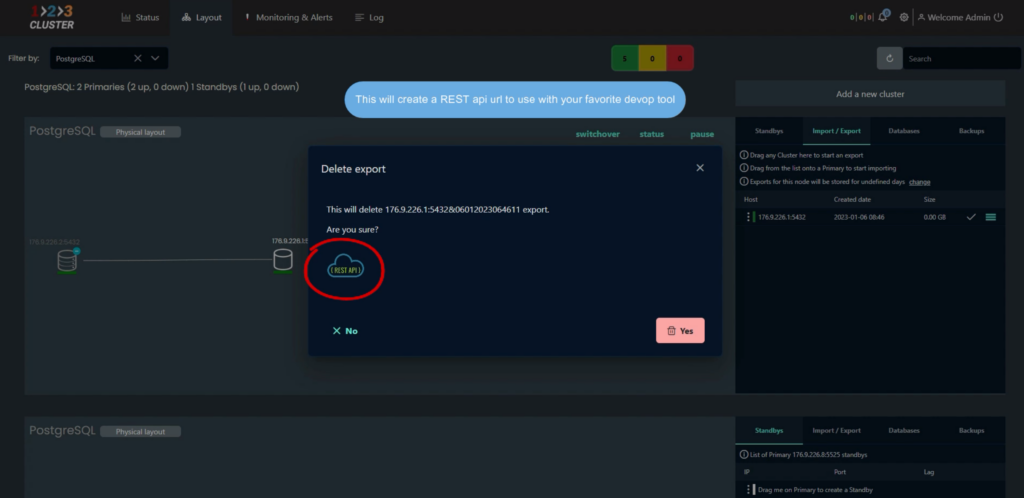
## Drop a backup or export

1. ### Switch to your 'Import/Export' tab to view your database inventory.

   <figure><img src="https://123cluster.com/wp-content/uploads/2024/04/pg_drop_export1.c9621d0641bc1e50c37c-1024x498-1.png" alt=""><figcaption></figcaption></figure>
2. ### Drag the export you wish to drop onto the bin.

   <figure><img src="https://123cluster.com/wp-content/uploads/2024/04/pg_drop_export2.a7b2764fb8ffc8404eae-1024x498-1.png" alt=""><figcaption></figcaption></figure>
3. ### 'Rest API' Button will copy to clipboard for your DevOps tools.

   <figure><img src="https://123cluster.com/wp-content/uploads/2024/04/pg_drop_export3.c2f919bd57b3d83f0d6a-1024x498-1.png" alt=""><figcaption></figcaption></figure>
4. ### Click 'Yes' to drop the export.


---

# Agent Instructions: Querying This Documentation

If you need additional information that is not directly available in this page, you can query the documentation dynamically by asking a question.

Perform an HTTP GET request on the current page URL with the `ask` query parameter:

```
GET https://123cluster.gitbook.io/123cluster/postgresql.md?ask=<question>
```

The question should be specific, self-contained, and written in natural language.
The response will contain a direct answer to the question and relevant excerpts and sources from the documentation.

Use this mechanism when the answer is not explicitly present in the current page, you need clarification or additional context, or you want to retrieve related documentation sections.
